
SketchUp AI Render Without a Subscription (2026 Workflow)
SketchUp's built-in AI Render costs 10 credits an image — 15 renders a month on Pro. The browser route is the other one: export a view, render it without a plugin. Credit maths, export settings, prompts, two real cases.
In this article
SketchUp's built-in AI Render costs 10 credits an image — 15 renders a month on Pro. The browser route is the other one: export a view, render it without a plugin. Credit maths, export settings, prompts, two real cases.
TL;DR. There are two ways to get an AI render out of a SketchUp model. SketchUp's own AI Render runs inside the app, needs an active Go, Pro, or Studio subscription, and costs 10 AI credits per image — which works out to 10 renders a month on Go and 15 on Pro. The browser route is the other one: export the view as an image, upload it, write a prompt, generate a concept render — the two runs shown below took about 30 seconds each. No plugin, no SketchUp subscription, three free renders a day without signing up. This guide covers the credit maths, the export settings that actually matter, four prompts you can copy, and two unretouched before-and-after cases.
Two Routes to an AI Render from SketchUp
Before you touch a single export setting, pick a route. They solve different problems.
Route 1 — SketchUp's built-in AI Render. SketchUp ships a generative AI feature that works from the active model viewport: frame a view, give it a text prompt or a preset style, and it generates an image you can bring back into the model. It also has Sketch, Paint, and Erase tools for regenerating parts of an image. It is the most integrated option and the right one if you are inside SketchUp all day and your seat already covers it.
Route 2 — export an image and render it in a browser. You export a standalone image and render it in a separate web tool. Nothing is installed, nothing is tied to a SketchUp version, and anyone can run it — including reviewers who do not have SketchUp at all. This is the route the rest of this article walks through.
What the built-in AI Render actually requires
These are the details most comparisons skip, so here they are plainly.
- A paid subscription. AI Render needs an active SketchUp Go, Pro, or Studio subscription. SketchUp for Web Free users get the Help assistant, but not AI Render. A 7-day SketchUp trial includes a limited number of credits if you want to test it.
- A recent version. SketchUp for Desktop 26.1 and up includes AI Render natively; on older supported versions you install it from the Extension Warehouse. It is not compatible with anything older than SketchUp 2024. On iPad it arrived in version 6.4 as part of the Expanded Toolset; on Web it is built in.
- Credits, at 10 per image. Every AI Render generation costs 10 AI credits. Credits reset monthly on your renewal date and unused credits do not carry over. Failed generations are not charged — credits come off only when the image lands in your Gallery.
- English prompts. AI Render is trained in English and works best with English prompts.
How far the included credits actually go
| SketchUp tier | AI credits / month | AI Renders / month |
|---|---|---|
| Free | 0 | 0 — not available |
| Go | 100 | 10 |
| Pro (incl. Scan, Advanced Workflows, Civil Contractor) | 150 | 15 |
| Studio | 200 | 20 |
| Studio for Higher Education | 200 | 20 |
| + SketchUp AI add-on subscription | +1,500 | +150 |
The add-on is a separate monthly subscription that auto-renews, is purchased through the in-app upgrade entry point, and only once per account per month — you cannot stack it for more credits.
Note that those same credits are shared with SketchUp's other AI tools; Generate Object costs 30 credits a go, so one generated object uses the same credits as three AI renders.
Side by side
| SketchUp AI Render (built-in) | Browser route (this guide) | |
|---|---|---|
| Where it runs | Inside SketchUp, from the live viewport | Any browser, from an exported image |
| Install | Native in Desktop 26.1+; an extension on older supported versions | None |
| Minimum version | SketchUp 2024 | Any version that can export an image |
| Licence needed | Active Go, Pro, or Studio | None — works without SketchUp installed |
| Free option | None (Free tier gets 0 credits) | 3 renders a day, no sign-up, watermarked, personal use |
| Cost per image | 10 credits → 10/mo on Go, 15/mo on Pro, 20/mo on Studio | Free tier, or a one-time pass for watermark-free HD output |
| Input | Current model view; image editing tools include Sketch, Paint, and Erase | Exported image |
| Usable by teammates without SketchUp | No | Yes |
| Tied to a SketchUp version | Yes | No |
Which one you want. Use the built-in feature when you want to work from the current SketchUp view without exporting. Use the browser route when you want to share an exported view with teammates, use an older SketchUp version, or try a separate rendering workflow. Compare each service’s allowance before planning a batch of variations.
Nothing stops you using both: the built-in feature while you are modelling, the export route when the image has to leave SketchUp.
AI Arch Generator is not affiliated with Trimble or SketchUp. Route 2 gives the generator no access to your model's editable objects, dimensions, or material assignments — it only ever sees the flat image you upload.
Why SketchUp + AI Specifically
SketchUp is the most common modelling tool in early-stage architectural work. It is fast to model in, easy to teach, and it exports cleanly. Its native rendering path, on the other hand, is limited: the built-in styles produce diagrammatic output, and the photorealistic route runs through V-Ray, Enscape, Twinmotion, or Lumion — each adding setup time, material assignment, lighting work, and licence cost.
AI rendering inserts a faster middle path. You keep modelling where you are productive, export a clean view, and generate a photorealistic concept image. The SketchUp model stays the source of truth; the render is a visualisation layer, not a second model.
Where this fits. Early concept exploration, client meetings, competition drafts, internal design review, marketing visuals before final renders are commissioned.
Where it does not. Final hero shots for a published project. Deliverables that need physically accurate light. Renders that must show a specific brand or product SKU.
Step 1 — Set Up the SketchUp Scene
Two things matter before you export: camera and visibility.
Camera
Set the camera deliberately. Framing is decided here — changing it afterwards means going back to SketchUp and exporting again.
- For exteriors, a slight downward angle with the eye level just above the first floor reads as professional architectural photography.
- For interiors, use a one-point or two-point perspective with the vanishing point centred or slightly off-centre. Avoid extreme wide angles; they distort.
- Use Save Scene to lock the camera. You will want to come back to the identical view for follow-up renders, and a saved scene makes that repeatable.
Visibility
- Hide section cuts, dimensions, text labels, and analytical layers.
- Turn viewport shadows off when you are exploring new lighting; leave them on only when the exported shading is part of what you want to keep.
- Hide reference geometry that is not part of the design — imported site context lines, massing-stage scale figures — unless you want it rendered.
The goal is a clean view of the design itself. Do this in a copy of the scene, not by deleting anything from your source project. And only upload material you are authorised to share.
Step 2 — Choose the Right Export Style
This is the highest-leverage decision in the whole workflow. The AI reads geometry from your linework; the cleaner and less ambiguous the lines, the better the render holds your design.
Recommended: Hidden Line + Edges Only
Go to View → Face Style → Hidden Line for white faces with clean edges. Then in View → Edge Style, enable Edges and disable Profiles, Depth Cue, Extension, Endpoints, and Jitter. Each of those adds visual noise the AI can read as architectural detail it should render.
Alternative: Shaded with No Textures
Shading without textures gives the AI tonal depth information, which sometimes helps on complex curved geometry. Try both on your first scene and compare — it costs one extra export.
Avoid: Full Textures and Sketchy Edges
Full textures bias the AI toward your texture choices instead of the prompt. Sketchy and hand-drawn edge styles introduce noise it reads as material variation.
When to break this rule. If the existing materials are part of the brief — you are showing a client the timber they already chose, not exploring alternatives — keep a separate textured export as a reference and say so in the prompt. Hidden Line is the default because it gives the prompt the most room, not because a textured export is always wrong.
Step 3 — Export
File → Export → 2D Graphic, format PNG. Two settings matter:
- Resolution. Export at a size where edges and openings are clearly readable, within the uploader’s limit. The cases below use 1280×946 and 1280×1677 inputs; preserve the framing you need.
- Anti-aliasing. On. Off produces jagged edges that read as noise.
Menu paths above are for SketchUp for Desktop; the Web and iPad interfaces differ. SketchUp's own Importing and Exporting Image Files documentation covers the dimension and anti-aliasing options in detail.
Open the saved file before you upload it. Check that edges and openings are readable at actual size and that nothing important is clipped at the frame edge. Keep the original export — upscaling a small screenshot does not put back detail that was never there.
Keep a one-line export record: SketchUp version, saved scene name, face style, format, pixel dimensions. When a later export produces a different result, that line is the difference between diagnosing it in a minute and re-testing for an hour.
SketchUp Export Checklist (Bookmark This)
| Setting | Value | Why |
|---|---|---|
| Face Style | Hidden Line | Clean white faces, no texture bleed |
| Edges | On | The AI needs them to read geometry |
| Profiles | Off | Adds weight the AI reads as material variation |
| Depth Cue | Off | Adds noise the AI misinterprets |
| Extension | Off | Confuses edge detection |
| Endpoints | Off | Reads as architectural detail |
| Jitter / Sketchy | Off | Biases the AI toward hand-drawn output |
| Shadows in viewport | Off | Default when exploring lighting; keep them only if the exported shading is part of the brief |
| Section cuts | Hidden | A section line reads as a wall |
| Dimensions / text | Hidden | The AI tries to render the labels |
| Camera FOV | 35–50° | Wider angles distort perspective |
| Saved scene | Yes | Locks the view so iterations stay comparable |
| Export format | PNG | Cleanest linework preservation |
| Export resolution | Clear edges at actual size | Preserve the detail visible in the source |
| Anti-aliasing | On | Avoids jagged edges read as noise |
If you only remember three rows: Hidden Line + Profiles Off + Section Cuts Hidden. Check the actual exported image before uploading.
Step 4 — Upload and Write the Prompt
Open the Architecture Generator and use the reference-image control to attach your export. PNG, JPG, and WebP are accepted; follow the size limit shown by the uploader. Confirm the image is actually attached before you submit — describing an image in the prompt is not the same as uploading it, and an unattached reference silently becomes a text-only generation.
The four-part prompt
- Style — contemporary, Scandinavian, Brutalist, Mediterranean, Japanese, mid-century modern
- Program — single-family residence, multifamily housing, commercial office, retail, hospitality, adaptive reuse
- Lighting — golden hour, dusk, blue hour, overcast midday, late afternoon
- Material accent — "warm timber cladding with dark steel mullions", "white stucco with terracotta roof", "raw concrete and bronze panels"
Four prompts you can copy
A. Exterior concept, exploring a direction. Use when the design is still moving and you want a look, not fidelity.
Contemporary residential villa, golden hour, warm timber cladding with dark steel mullions and full-height glazing facing the garden. Photorealistic architectural visualization, natural daylight, soft shadows.
B. Preserve the design, improve only the finish. Use when the massing is settled and you want the same building to read as a photograph. This is the most under-used prompt pattern and the one that makes AI output defensible in a design review.
Turn the uploaded model view into a photorealistic architectural visualization in natural daylight.

Preserve the original camera angle, framing, composition, and layout. Keep the roof form, columns, railings, steps, and all openings in their original positions, shapes, and proportions. Preserve the site elements and any objects cut off by the image edges.

Only improve the realism of the existing materials — wood, roof tiles, stone, water, vegetation. Add natural lighting, soft shadows, and realistic reflections.

Do not add buildings, openings, or furniture. Do not move existing elements or crop the image.
C. Interior, same room, new material direction. Use for interior exports where the layout is fixed.
Photorealistic interior visualization of the uploaded view. Keep the room dimensions, window positions, and furniture layout exactly as shown. Replace finishes only: oak floor, white plaster walls, matte black fixtures. Soft afternoon daylight from the existing windows, no added light sources.
D. Locked baseline, one variable changed. Use on a render you already like, to produce a comparable alternative.
Same building, same camera, same time of day. Change the facade material only: white stucco with a terracotta roof instead of timber. Keep everything else identical.
Keep the first attempt focused. Changing style, camera, materials, and landscaping at once makes it impossible to tell why the output differs from the input. Or start from a template if you want a known-good baseline before writing your own.
Step 5 — Compare the Render Against Your Export
Put the result beside the exported image and check, in this order:
- Silhouette, camera direction, relative massing. If these drifted, nothing below matters — regenerate.
- Floor divisions, roof form, entrances, major window positions.
- Material boundaries around corners and openings. A material that wraps a corner in your model may not wrap in the render.
- Additions and artifacts. Unwanted furniture, invented openings, distorted edges, leftover labels.
A convincing image can still misrepresent the design. Decide up front which differences are acceptable for this specific exercise, and reject results that change what the brief requires you to preserve — even when the lighting looks better than what you asked for.
For early concept work, minor drift is acceptable. For anything that has to match a built reality, the render is a visualisation layer, not a documentation source.
A Real First Pass: Pavilion Before and After
Here is one unretouched attempt, so you can calibrate what "first pass" actually means.
The input is a 1280×946 model view of a pavilion beside a curved shoreline. The grey background, green axis line, and objects clipped at the frame edges are all present in the source image.
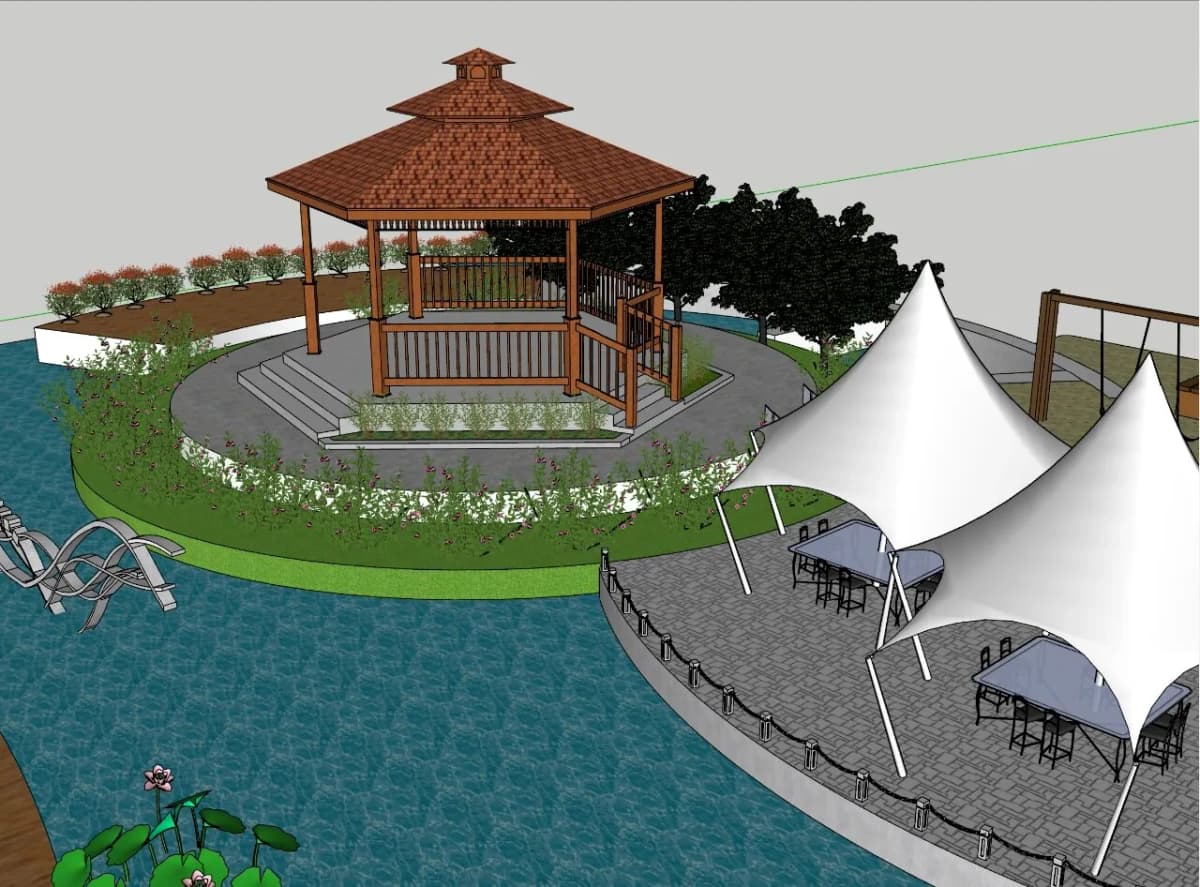
The goal was to improve materials and daylight while keeping the arrangement. This Architecture run used a pavilion-specific preservation prompt, submitted once; pattern B above is a reusable adaptation.
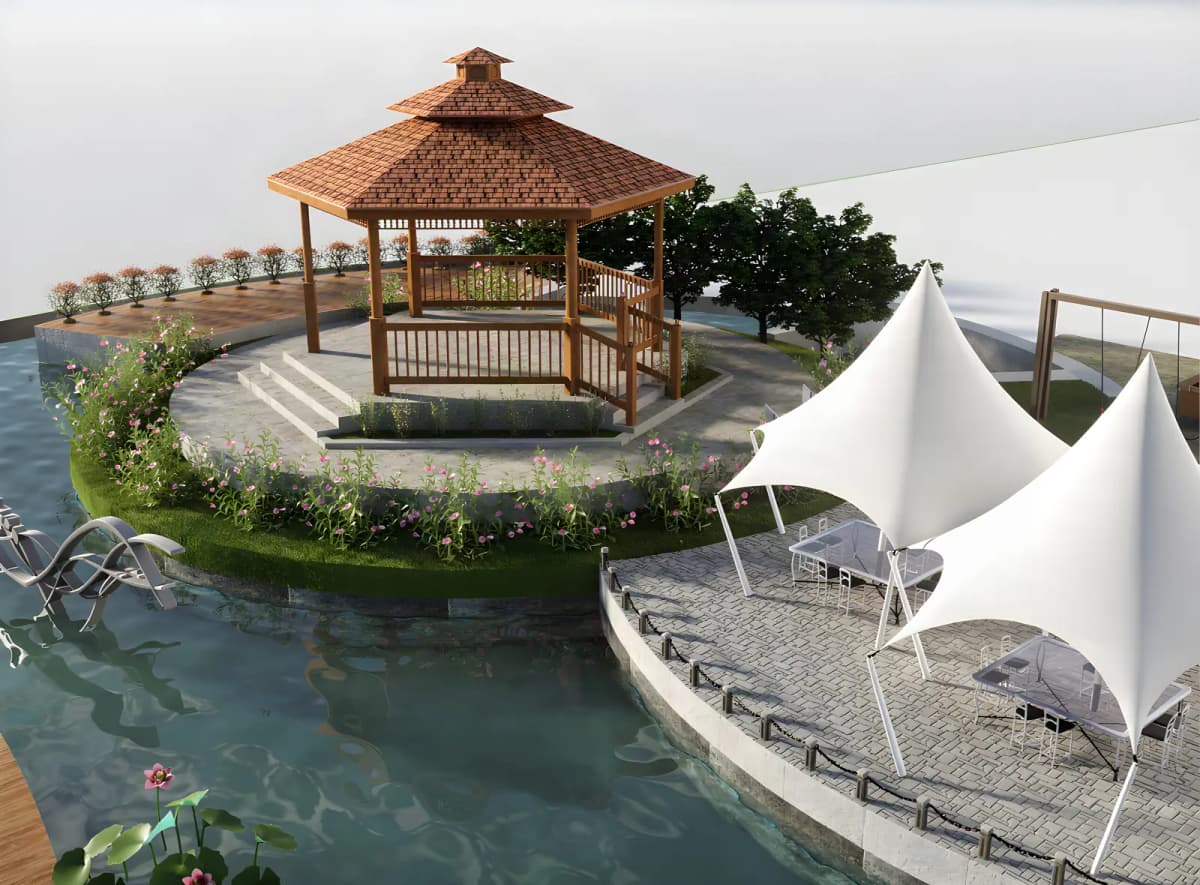
One attempt, roughly 30 seconds. No editorial retouching.
| What improved | What still needs attention |
|---|---|
| The pavilion, curved shoreline, and two white canopies keep their overall arrangement | Some railing, step, and furniture details differ from the input |
| Roof tiles, timber, paving, and water have far richer texture and lighting | Planting grew taller and denser, changing what it hides |
| The scene reads as a daylight photograph rather than a model view | The grey background and green model axis are still there |
The main composition carries through and the materials are easier to judge. Before using it in a presentation, clean up the background and axis in the source view and review the changed planting and small details. Step 1 helps keep unwanted source elements out of the next attempt.
Interior SketchUp AI Render: What One Pass Changed
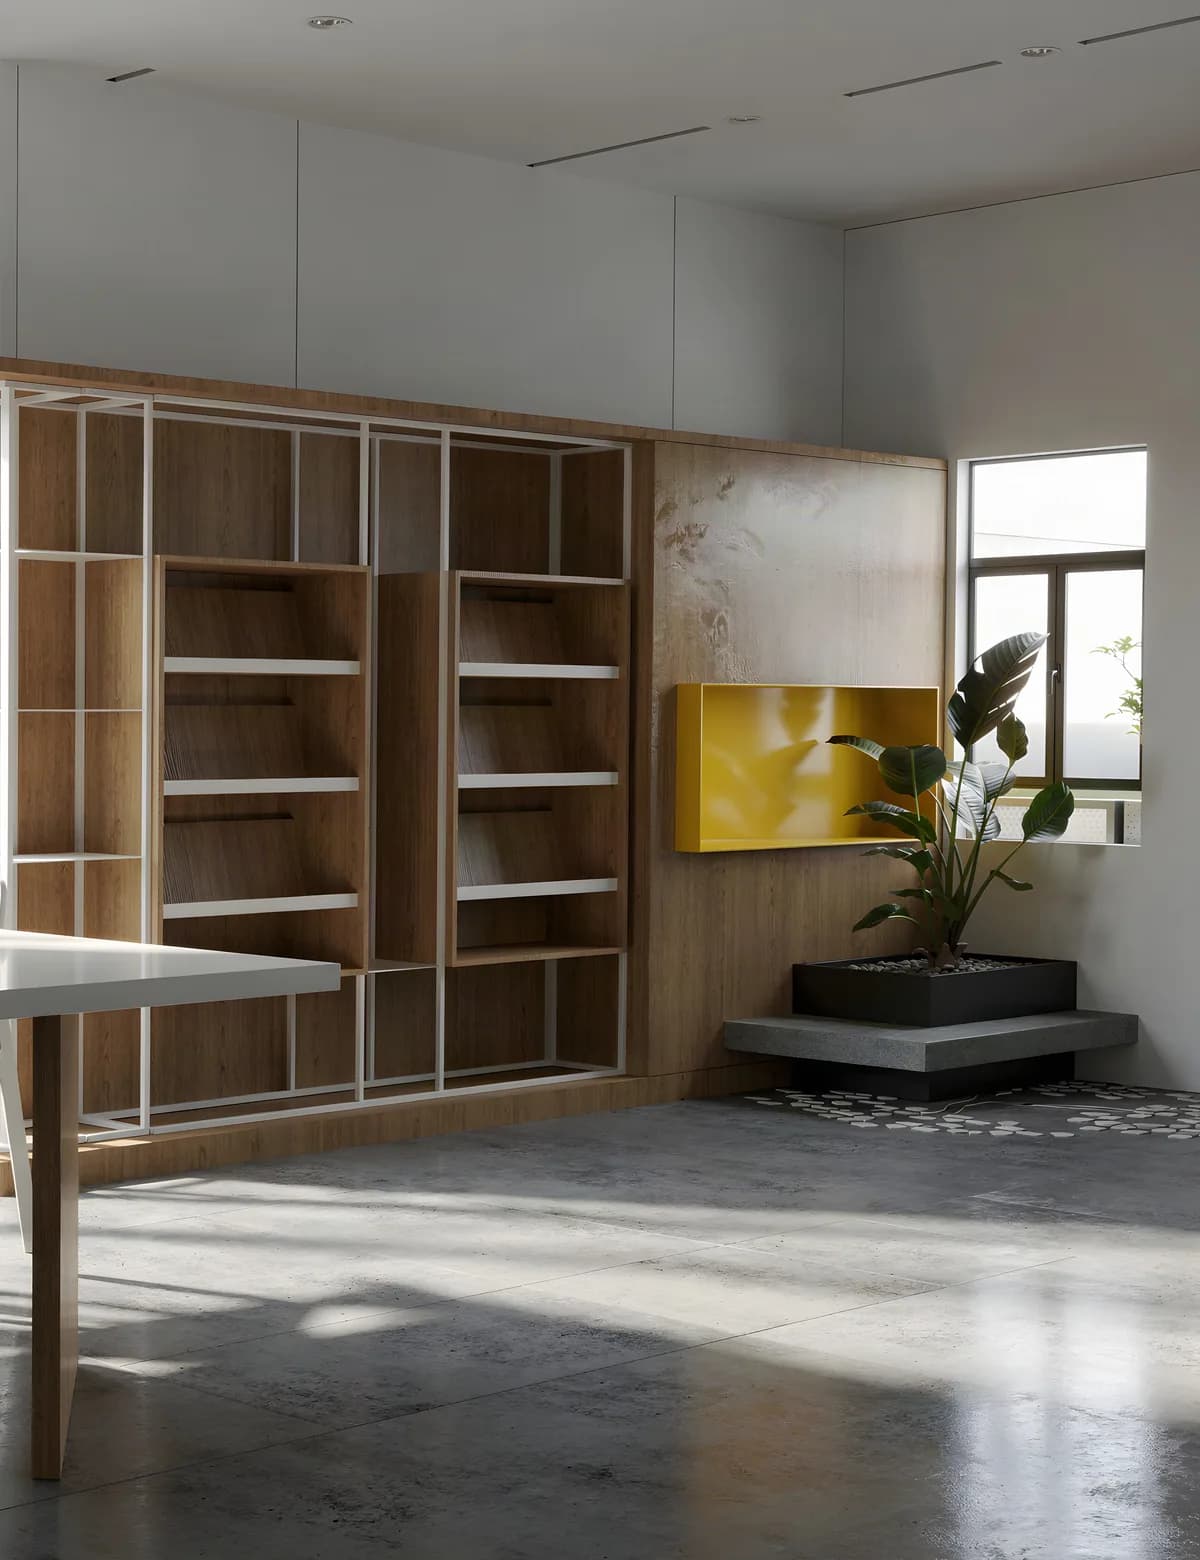
The second case uses an interior view with no visible model axis and a clear view of the shelving, window, and planter.
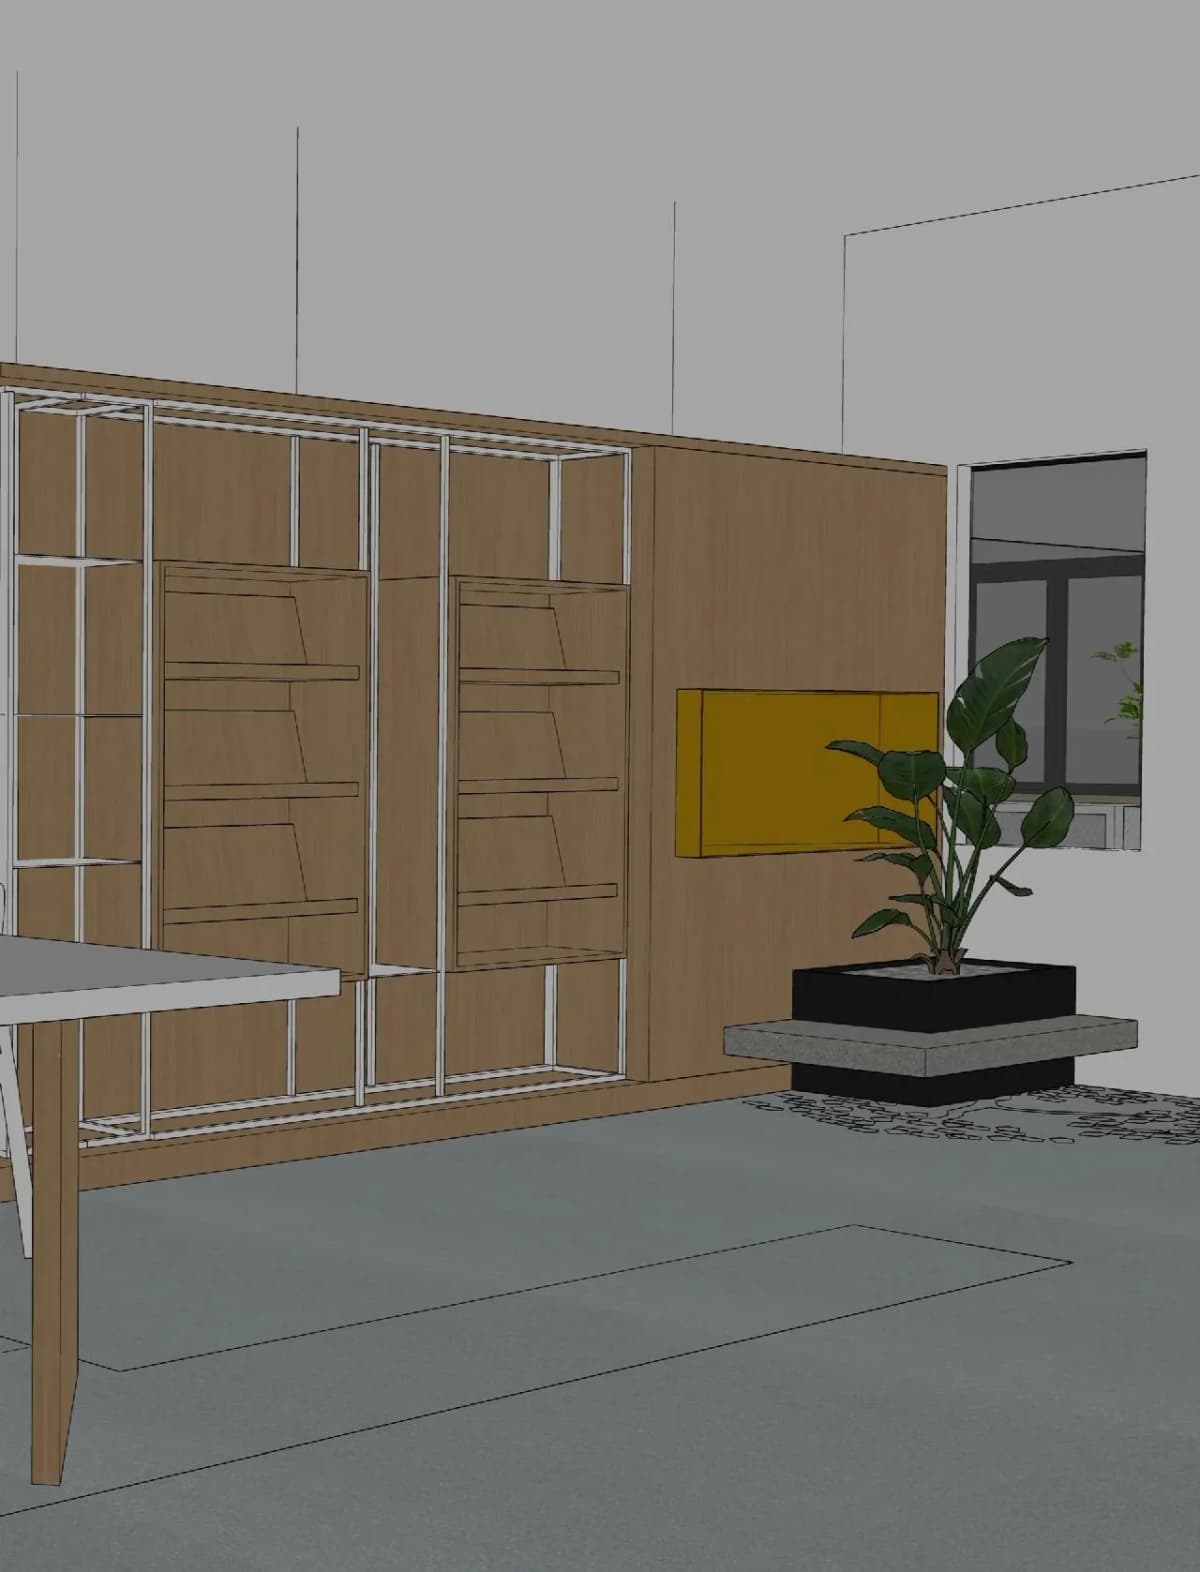
This one used prompt C above: one generation, no retouching, about 31 seconds. The 1280×1677 input came back as a 5120×6656 image, keeping the portrait composition.
| What carried through | What the AI added or changed |
|---|---|
| The main camera view and room arrangement carry through | The bare ceiling became a finished ceiling with downlights and linear slots |
| Shelving wall, white metal frame grid, and shelf divisions are in place | The flat timber panel beside the window reads as mottled plaster |
| The yellow wall box keeps its position, size, and proportion | The yellow box picked up a glossy finish instead of the flat colour |
| Planter, stone bench, window mullions, and the table at left are all where they should be | Daylight and reflections changed; the concrete floor remained despite the prompt requesting oak |
This is a usable concept image: the shelving, yellow box, planter, window, and table remain recognisable in their original arrangement. Prompt C asked for no added light sources and for an oak floor; the ceiling picked up fixtures anyway and the floor stayed concrete. Those two, plus the plaster patch and the glossy yellow finish, are what you would name in a follow-up prompt if the brief depends on them.
Why both cases are here: the pavilion shows a source view whose leftovers — grey background, model axis — carried straight through into the result, and the interior shows one with none of them. They are different scenes, prompts, and generators, so this is not a comparison of output quality. What they share is the review: the same checks from Step 5, run against the export each time.
Step 6 — Iterate One Variable at a Time
Keep one export and reuse it. Every variation then starts from identical geometry, so the only thing separating two results is the thing you deliberately changed — which is what makes them worth putting side by side in front of a client.
Three patterns that work:
Same export, three styles. Scandinavian / Mediterranean / Brutalist from one image. Best for showing a client alternative directions in a single meeting.
Same export, three lighting conditions. Golden hour / overcast midday / dusk. Good for assessing how the building reads across a day.
Locked baseline, material variations. Lock a render you like, then change materials only (prompt D above). This is the pattern that compounds.
Two rules that save time: if the input is unclear, go back and re-export rather than rewriting the prompt; and review edits as carefully as first generations — asking for one material change does not guarantee every other pixel stayed put. Keep each input and its outputs together so you can always tell a re-export from a prompt-only change.
Worth noting on cost: this iterate-wide pattern is exactly the one that empties a credit balance. Three styles × three lighting conditions is nine images — 90 credits, or most of a Go month, before you have chosen anything.
Common Problems and What to Check
| Problem | What to check next |
|---|---|
| The framing is not what you expected | Re-export from SketchUp with the composition you want — cropping later reduces the pixels available for the remaining composition |
| Windows or roof details changed | Whether the linework is readable at actual size; reject changes the brief forbids |
| Labels or dimensions appear as artifacts | Hide annotations in the export scene and re-export |
| A wall appears where there should be an opening | A visible section cut in the export — hide it |
| Heavy perspective distortion | Camera FOV; bring it back to 35–50° |
| The render ignored your prompt and kept your colours | Full textures in the export — switch to Hidden Line |
| Every iteration has a slightly different camera | Check the saved source view first, then compare whether generation changed the framing |
| A specific product finish is only approximated | Use a workflow that can represent the exact material, and verify it |
| The reference image did not attach | Resolve the upload error before generating again |
SketchUp + AI vs V-Ray and Enscape: When to Use Which
Use AI rendering when: the design is still moving; you need several directions in one client meeting; you are drafting a competition board before committing to final renders; you are producing internal review material that does not need exact specified materials; or the deadline is shorter than V-Ray setup alone would take.
Use V-Ray / Corona when: the design is locked and you need a hero shot; the deliverable specifies materials by brand and SKU; a developer client will use the image in marketing material; or you need physically accurate light.
Use Enscape / Twinmotion / Lumion when: you need a real-time walkthrough; the project goes to VR review; or materials are already assigned and you want immediate feedback while designing.
Pick by deliverable, not by preference. A concept image, a specified-material render, and a live walkthrough are three different jobs, and most projects need more than one of them before they finish.
Know What the Image Is For
This workflow explores appearance. It does not produce an editable model, and a generated image establishes no dimensions, no material specification, and no lighting performance. Those stay in the SketchUp project — and that is the thing to say out loud when the image goes in front of a client.
FAQ
Is SketchUp AI Render free? No. It requires an active SketchUp Go, Pro, or Studio subscription. SketchUp for Web Free accounts get 0 AI credits, so AI Render is unavailable on the free tier — the 7-day SketchUp trial is the only free way to try it, and it includes a limited number of credits.
How many credits does SketchUp AI Render use? 10 credits per generated image. Included monthly credits are 100 on Go, 150 on Pro, and 200 on Studio — so 10, 15, and 20 renders a month respectively. Credits reset on your renewal date and unused ones do not roll over. Failed generations are not charged.
What happens when I run out of AI credits? SketchUp offers a separate AI add-on subscription with 1,500 extra credits a month. It auto-renews monthly, is purchased through the in-app upgrade entry point, and only once per account per month — it cannot be stacked. Alternatively, export the view and render it in a browser, which is what this guide covers.
Can I AI render a SketchUp model without a subscription?
Yes. Export the view as an image and render it in the browser. Nothing is installed and nothing checks your SketchUp licence, because the tool never sees your .skp file — only the flat image you upload.
How do I AI render in SketchUp if my version is too old?
AI Render does not work on anything older than SketchUp 2024. Use the export route instead: File → Export → 2D Graphic, then upload the PNG. It works on any version that can export an image, including SketchUp Free on the web.
Does the built-in AI Render give better results than the browser route? The built-in feature works from the current SketchUp view and includes image editing tools. The browser route works from an export that teammates can use independently. The cases here test the browser route; they do not establish a quality ranking between the two.
Is the built-in AI Render itself a plugin? On SketchUp Desktop below 26.1, effectively yes — you install it from the Extension Warehouse. From 26.1 it ships natively, and on Web and iPad it is built in. Third-party plugin renderers are a separate category (Veras and Lookx among them): they remove the export step, but add install complexity, a per-seat licence, and coupling to a specific SketchUp version.
How many attempts does it take to get something usable? The selected interior result was usable after one generation. The pavilion also used one generation, but needed further cleanup before presentation. Inspect your first result before deciding what to change next.
Try It on Your Own Model
The fastest way to evaluate this is to take a SketchUp scene from a recent project and run it through once.
- 3 free renders a day, no sign-up, no card
- No plugin, no install, no SketchUp subscription
- Pre-built styles for residential, commercial, hospitality, and adaptive reuse
- Watermark-free HD output available as a one-time pass rather than a monthly subscription
Related reading: the SketchUp AI rendering use case for a shorter overview and supported inputs; AI Architecture Render vs V-Ray for the cost and time comparison; the complete sketch-to-render guide for the broader category; and how to convert a hand sketch to a render for hand-drawn input.
Sources
SketchUp figures in this article were taken from Trimble's own documentation on 20 September 2026. Subscription terms and credit allowances change — check the source pages for current values.
- Getting Started with AI Render — system requirements, subscription requirement, version compatibility (page updated 21 Aug 2026)
- AI Credits — per-tier monthly credits, 10 credits per AI Render, reset and carry-over rules (page updated 17 Sep 2026)
- SketchUp AI Subscription — the 1,500-credit add-on and its purchase limits
- SketchUp AI plans page — free-tier availability, native vs extension by platform
More Posts
More Posts
Sketch to Render AI: How Architects Turn Hand Drawings into Photorealistic Renders in 2026
A practical guide to AI sketch-to-render for architects, students, and designers. What it does, how it fits real workflows, and where it still falls short.
AI Virtual Staging for Real Estate: The 2026 Realtor Playbook
When AI virtual staging wins vs traditional staging, MLS disclosure rules, and the per-listing economics that make it work for every vacant listing.
AI Rendering vs V-Ray: Choosing a Concept Workflow
Compare image-based AI concept exploration with a scene-based V-Ray workflow, including revision control, review effort, and total task cost.
Get the next product and workflow notes in your inbox
Newsletter
Join the community
Subscribe to our newsletter for the latest news and updates